This tutorial will explain about MS Access Option Group and how to create it. Option Group or sometimes called Radio Button is the UI controls to provide quick, intuitive way to select from two or more mutually exclusive data values, for example is Yes or No, or Female or Male in Gender. It provide neater interface than drop down menu.
Radio buttons are called as Option Group because selecting one button automatically De-selects the other button (or other buttons) in the same group, meaning that it can only have one value. In Access, Option Group only can be used in Forms, and sometimes in Reports.
#1 Bounded Option Group
Bounded means that the option buttons bound to a field with either a number data type or a “Yes/No” data type. For this example, we use the Gender field from Member database.
1. In Table Design, create a new field with Yes/No Data Type. Save the table.

2. Create a new blank Form or use existing Member Form. Switch the view to Design View.
3. On Design tab > Controls group > click Option Group. Then drag to the layout to create one.

4. On Option Group Wizard, input the label names. Because it is bounded with Yes/No Data Type, input only 2 names. Click Next.
5. Select the default value, hit Next.
6. Assign the value for the label. Yes/No Data Type only have 0 (equivalent to No) and -1 (Yes value) values. Hit Next

7. Choose “Store value in this field”. Select the desired field from the combo box. Click Next.

8. Choose control type: Options (only one value), Checkbox (choose one or many value), or Toggle (like options, differ in interface). Then, select the Design style. Hit Next.
9. Rename the Options Caption. Click Finished.

#2 Unbounded Option Group
Bounded Option Group has limitation only for 2 values, and it would not show the value other than Yes/No. On Gender example above, when we retrieved the data to tables or report, it will still show Yes/No. Unbounded Option Group surpasses those limitation. The steps is almost same through.
1. On Option Group Wizard, input the labels.
2. Select default choice. Assign the values in number.
3. Choose “Save the Value for later use”.

4. Define the design and rename the captions.
5. Select the Option Group, press F4 to open Properties Sheet.
6. On Event > After Update, click the builder. Choose Code Builder.
7. Input following code, then save.

8. Back to Access, On Property Sheet change the Selection Type to Form.
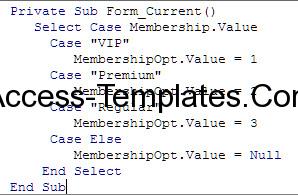
9. On Event > On Current, click the builder, select Code Builder then input the code:

10. Save and test your options.
Related Access Database
- ms access option group